Sadevio Self-Service Kiosk
The Sadevio Self-Service Kiosk is a secure, enterprise-grade check-in solution designed to streamline visitor registration, improve front-desk efficiency, and enhance the overall visitor experience. It enables visitors to check in independently while ensuring compliance with security, privacy, and accessibility requirements.
The kiosk integrates seamlessly with the Sadevio Visitor Management System, providing real-time communication with hosts, access control systems, and backend workflows. It is designed for high-traffic environments such as corporate offices, manufacturing sites, research facilities, and government buildings.
Replacing the Timer Battery in the Kiosk
Required Tools
-
Screwdriver
-
Wrench or socket tool (for loosening the nuts, size depends on model)
-
4 × AA batteries (new)
1. Disconnect power
-
Unplug the kiosk from the power outlet to ensure it is completely powered off.
2. Remove the cover
-
Use a wrench or socket tool to loosen and remove the 4 nuts.
-
Remove the cover carefully.
3. Loosen the timer (if required)
-
If the timer is mounted tightly:
-
Slightly loosen the 2 nuts on the left and right side of the timer using the wrench or socket tool.
-
Do not remove them completely.
-
4. Remove the timer from the DIN rail
-
On the bottom side of the timer, locate the red release knob / lever.
-
Use a screwdriver to push it downward.
-
Pull the timer forward to remove it from the DIN rail.
5. Replace the batteries
-
On the back side of the timer:
-
Replace the 4 AA batteries.
-
Make sure the polarity (+ / –) is correct.
-
6. Reinstall the timer
-
Mount the timer back onto the DIN rail and press it firmly into place.
-
Tighten the previously loosened nuts using the wrench or socket tool.
7. Check connections
-
Before reinstalling the cover:
-
Check all connectors and terminals.
-
If any connectors are loose, gently tighten them with a screwdriver.
-
8. Reinstall the cover
-
Put the cover back on and secure it with the 4 nuts.
9. Power on and set mode
-
Plug the kiosk back into the power outlet.
-
Set the timer switch from AUTO / MANU to ON.
Refill card stacker
1. Remove cards from the recycle bin
-
Remove new cards from the recycle bin and prepare them for loading.
-
Make sure the cards are aligned and clean.
2. Remove the card stacker box
-
Locate the release switch on the side of the card stacker box.
-
Pull the release switch.
-
Lift the box upward to remove it from the stacker.
3. Load cards into the box
-
Inside the box, locate the metal spring-loaded slider (card pressure plate).
-
Lift the metal slider upward.
-
Place the cards under the slider, making sure they are stacked evenly.
-
Slowly release the slider so it rests on top of the cards, applying pressure.
⚠️ Important: The metal slider must always be on top of the cards to ensure proper feeding.
4. Reinsert the box into the stacker
-
Insert the box back into the card stacker.
-
Check the direction label on the top of the box and ensure it is oriented correctly.
-
Push the box down until it locks firmly into place.
5. Final check
-
Gently pull on the box to confirm it is securely locked.
-
The card stacker is now ready for operation.
Setting Up the Kiosk
⚠️ Important Safety Notice (Before Setup)
-
The transport wheels must be removed before operating the kiosk.
The wheels are for transportation only and must not be used during normal operation.
Power Connection
-
On the lower back side of the kiosk, you will find a small access door.
-
Behind this door are:
-
Power plug
-
Ethernet input
-
Power switch
-
-
Connect the power cable to the kiosk.
-
Turn the power switch to ON.
Network Connection
We strongly recommend using a wired Ethernet connection for best reliability.
Ethernet Connection (Recommended)
-
On the lower back side of the kiosk, connect the Ethernet cable to the Ethernet port.
-
Configure the network settings on the kiosk:
-
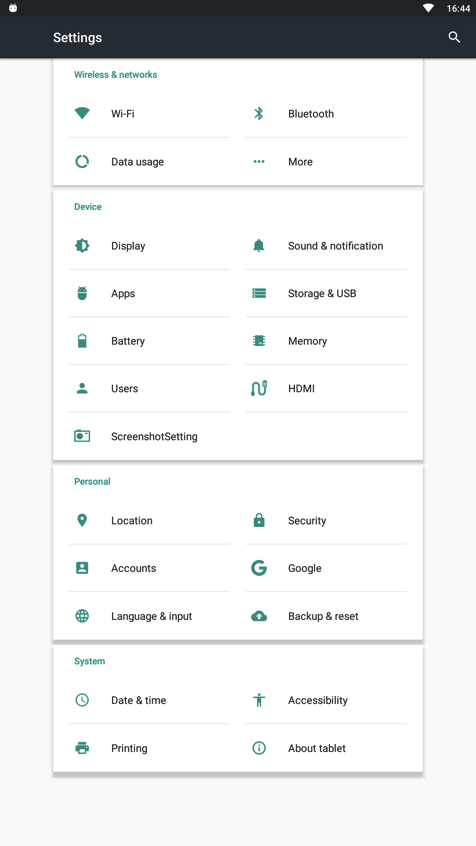
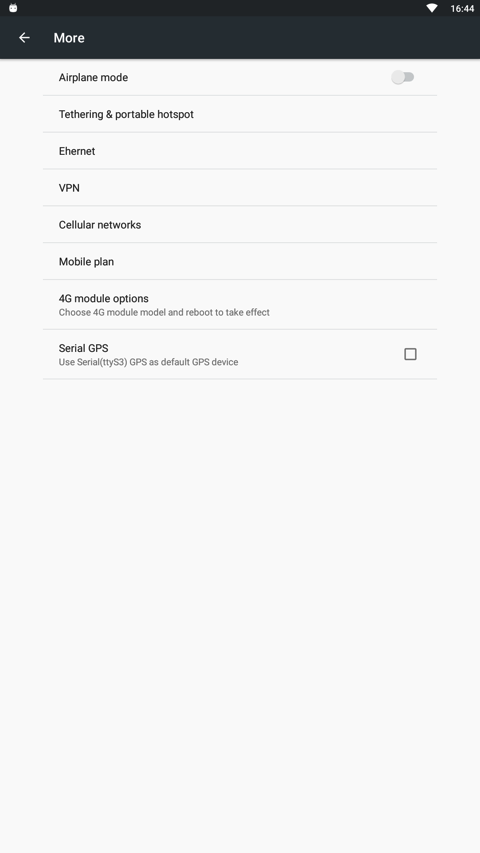
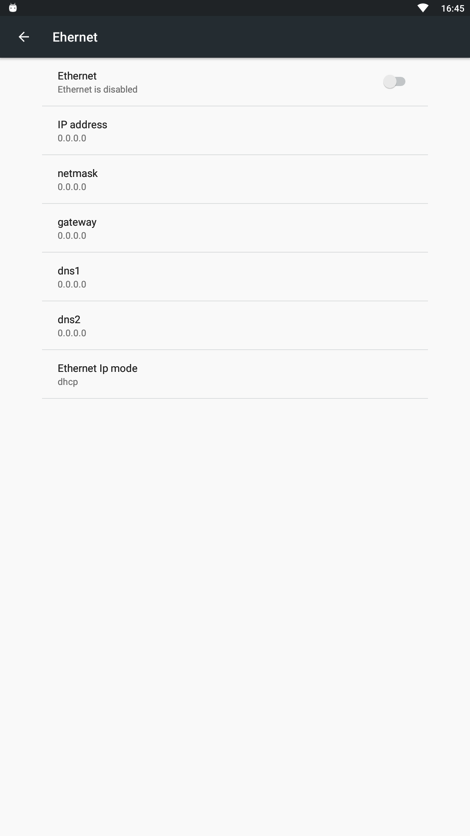
Go to Settings → More → Ethernet
-
-
Activate the Ethernet connection.
-
Configure your network-specific settings (e.g. DHCP or static IP).
📌 Recommendation:
If you are using a wired Ethernet connection, we recommend disabling Wi-Fi.
Wi-Fi Connection (Optional)
If Ethernet is not available, Wi-Fi can be used.
-
Go to Settings → Wi-Fi
-
Enable Wi-Fi
-
Select the Wi-Fi network you want to connect to
-
Enter the password if required
- Verify that the Wi-Fi connection is successfully established